Inventory Tracking in QuickBooks
Knowing where you stand with your company’s product count is crucial. QuickBooks can help you stay current with its inventory tracking tools.
If your company sells physical products, you know how important it is to always be aware of your stock levels. You have to know what’s selling and what’s not. And you need to get a head start on ordering new inventory when yours is running low.
The tricky part is always having enough available to meet the needs of existing orders as they come in. On the other hand, you don’t want to have too much money tied up in products that are selling slowly. It’s a delicate balance, and one you can’t maintain unless you have very precise inventory records and reports.
QuickBooks helps with both sides of this equation. It allows you to create detailed records for each of your company’s products that both track your existing stock levels in real time and alert you when it’s time to re-order. Plus, specialized reports provide insight on your inventory as a whole. Here’s how it works.
Getting Set Up
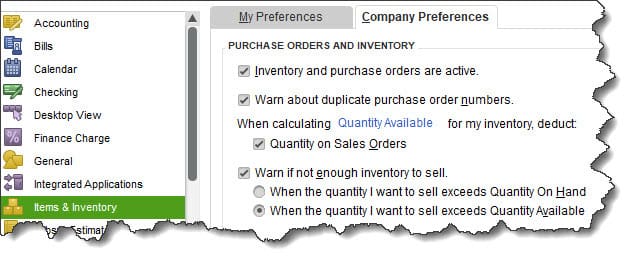
Before you start entering item records, you need to make sure that QuickBooks is set up for inventory tracking. Open the Edit menu and select Preferences, then Items & Inventory. If you are the administrator, you can click on the Company Preferences tab to open this window.

Before you start working with inventory, you must make sure that QuickBooks is ready.
Click in the box in front of Inventory and purchase orders are active if it’s not already checked. Check the next two boxes if those apply to you, then respond to the final query. Quantity On Hand refers to the number of units you actually have in stock. Some items may not be available if they’re committed to assemblies, for example. So choose one of the two conditions that should trigger a warning about inaccessible inventory.
When you’re done here, click OK.
Creating Accurate Records
Even if you have a relatively modest catalog of products for sale, we recommend that you use QuickBooks’ inventory tracking. It’s just too difficult to keep tabs on your item levels manually, especially if you sell in any volume. And errors in this area may mean you come up short when customers order products that you thought were available but weren’t. You could easily lose business.
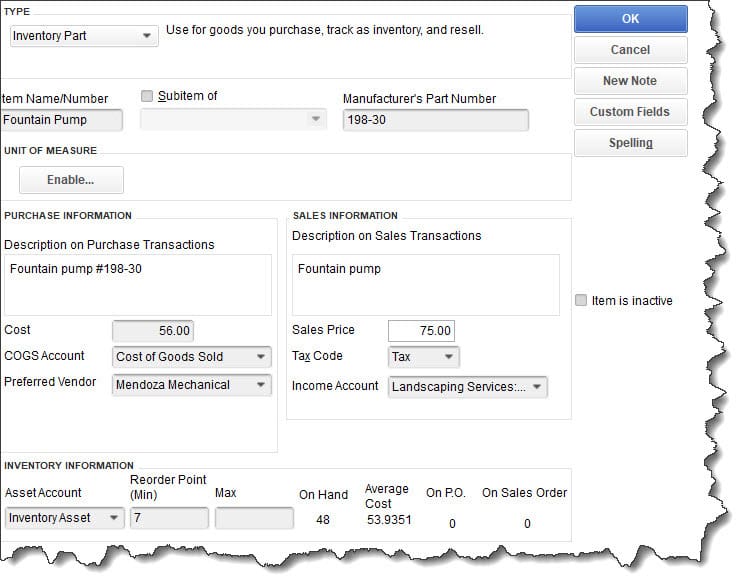
To start creating item records, click the Items & Services icon on the home page or open the Lists menu and select Item List. Right-click anywhere in the window that opens and select New. Under Type in the upper left corner, click the down arrow and select Inventory Part. This just means that you want to be able to track how many of this item that you have in stock.

QuickBooks provides detailed record templates for your item records.
You don’t necessarily have to complete every field in these records, but the more thorough you are, the more comprehensive and accurate your inventory tracking will be. Enter an Item Name/Number. If this product will be a subitem of another, check that box and select the parent item. Manufacturer’s Part Number is optional.
In the two columns below these fields, you’ll provide Purchase Information and Sales Information. In the left column, enter the text that would appear on a purchase order and the Cost the vendor charges for the item. The Cost of Goods Sold account should appear by default. Change it if it doesn’t. And if you have a Preferred Vendor, select it from the drop-down list.
The right column should contain information about your own sale of the item. How will the Description on Sales Transactions read? This may be different from the vendor’s text. What will your Sales Price be? This will, of course, be higher, so you can make a profit. Is the item taxable? Select the correct jurisdiction under Tax Code if so. You’ll then need to select your Income Account. You may want to consult with us on this issued, because it’s important that you make the right choice — or know how to create your own.
On the bottom row here, let the first field default to Inventory Asset. If you want to be reminded to reorder when your inventory count hits a specific number, enter a number in the field below Reorder Point (Minimum). Provide the number you currently have On Hand. The remaining fields will be automatically completed by QuickBooks. When you’ve finished here, click OK. Your item will now appear in the Item List and will be available to use in sales and purchase forms.
QuickBooks can quickly show you the status of your items in the form of numerous reports. Open the Reports menu and hover your mouse over Inventory to see the list that’s available, including Inventory Stock Status by Item and Inventory Valuation Detail.
Simple or Complex?
QuickBooks Pro and Premier can handle very simple inventory tracking and even meet more complex needs in some cases. If you find that it doesn’t do everything you need, you have options. There are add-on apps that expand on the software’s capabilities and more senior versions of QuickBooks that offer robust inventory management. Please contact us if you want to explore one of these or if you need help understanding the basics of inventory tracking in your current version.